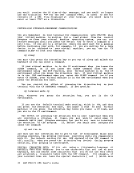
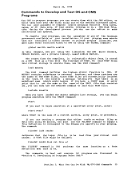
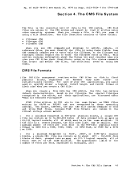
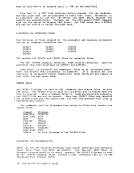
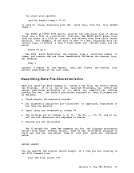
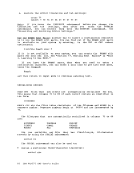
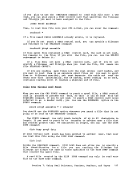
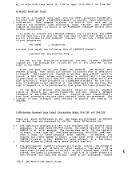
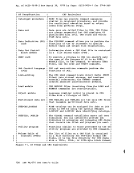
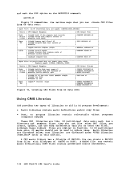
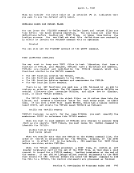
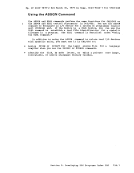
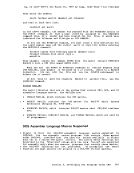
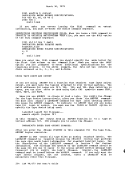
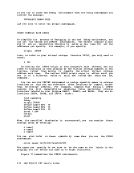
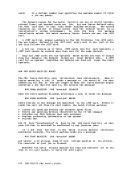
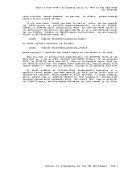
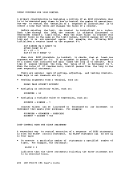
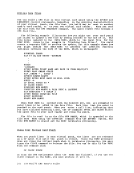
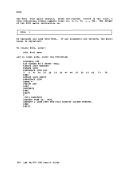
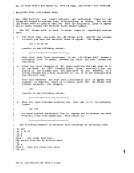
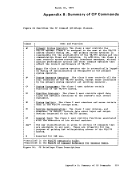
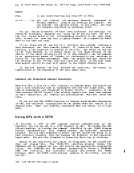
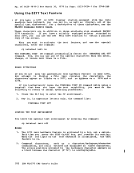
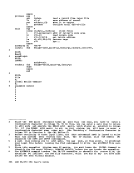
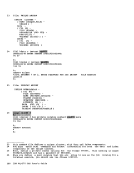
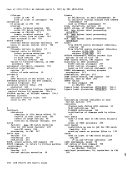
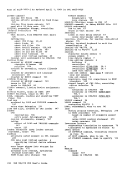
March 30, 1979 Sample Terminal Session Using the Editor and CMS File System Commands
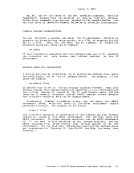
This terminal session shows you how to create aCMS CMS editor, and then manipulate it using the CMS file system commands, COPYFILE, ERASE, RENAME, and SORT. TYPE subcommand or command is issued
that results in a display of the entire file, the complete display is not shown; omitted
lines are indicated by vertical ellipses (••• ). When you enter the TYPE command or
subcommand, you should see the entire display.
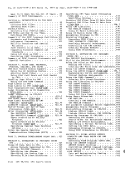
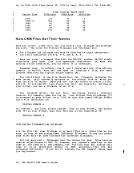
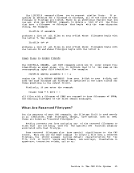
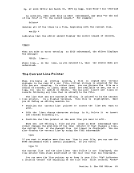
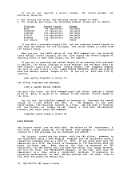
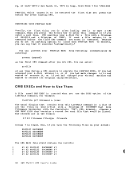
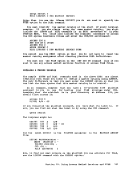
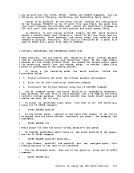
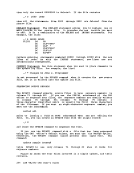
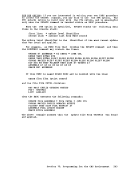
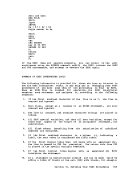
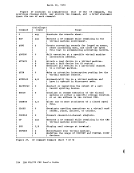
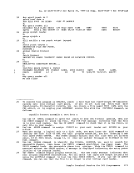
1 edit command dataNEW FILE:
EDIT:
2 imageON tabs 1 12 80 trunc 12
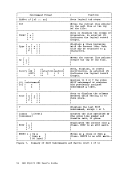
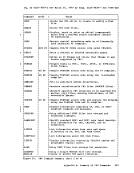
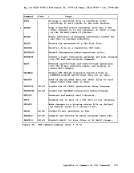
3 inputINPUT: copyfile copy cms files
sort sort cms files in alphameric order by specific columns
edit create a cms file
edit modify acms file
rename change the name of a cms file
punch punch a copy of acms file on cards
print print a cms file
erase erase a cms file
listfile list information on a cms file
state verify the existence of acms file
statew verify the existence of acms file on a read/write disk
readcard read a cms file from your card reader onto disk
disk dump punch a cms file in cms diskdump format into your virtual card punch for
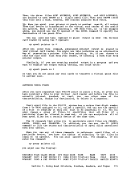
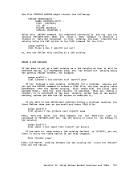
4TRUNCATED 5 DISK DUMP PUNCH A CMS FILE IN CMS DISK DUMP FORMAT INTO YOUR VIRTUAL CA disk load read a disk dumF file onto disk
compare compare the contents of ems disk files
tape dumpdumF ems files ento tape
tape load read cms files onto diskfrom tape
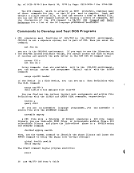
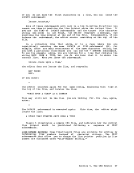
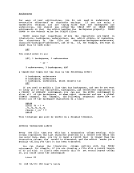
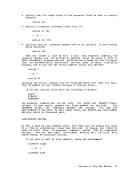
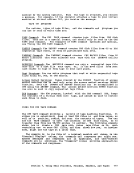
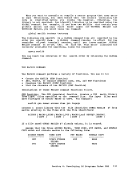
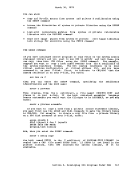
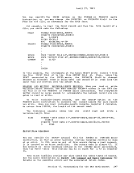
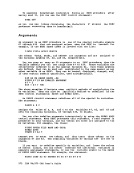
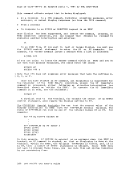
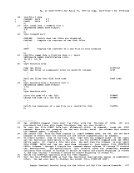
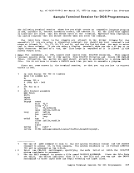
EDIT:
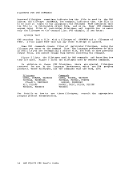
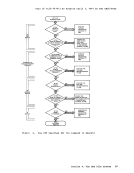
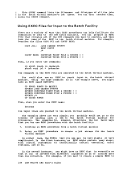
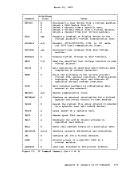
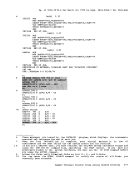
1Use the EDIT command to invoke the CMS editor to create a file with a filename of COMMAND and a filetype of DATA. Since the file does not exist, the editor issues
the messageNEW FILE.
2 Check that the image setting isON. This is the default for all filetypes except SCRIPT. Then, set the logical tab stops for this file at 1, 12, and 80, and set a
truncation limit of 12.
3 Enter the subcommandINPUT to enter input mode and begin entering lines in the file.
For these input files, you should press the Tab key (or equivalent) on your terminal
following eachCMS command name. If there is a physical tab step on your terminal
in column 12, the input data appears aligned.
4 The message,TRUNCATED, indicates that the line you just entered exceeded the
truncation limit you set for the file (column 12). The editor displays the line, so
you can see how much of the line was accepted.Your virtual machine is still in
input mode, so continue entering input lines.
5 To get out of input mode, enter a null line (press the Return or Enter key without
entering any data). The editor responds with the message EDIT:.
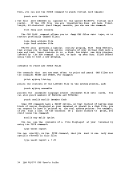
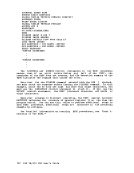
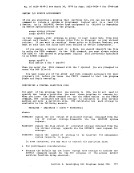
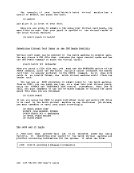
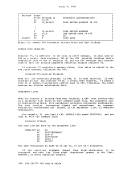
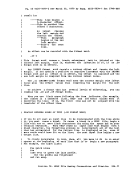
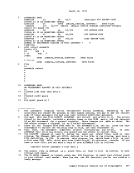
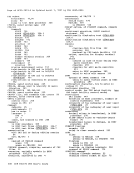
354IBM VM/370 CMS User's Guide
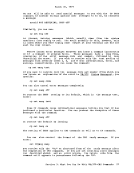
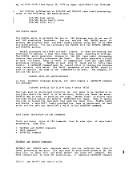
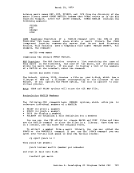
This terminal session shows you how to create a
that results in a display of the entire file, the complete display is not shown; omitted
lines are indicated by vertical ellipses (
subcommand, you should see the entire display.
1 edit command data
EDIT:
2 image
3 input
sort sort cms files in alphameric order by specific columns
edit create a cms file
edit modify a
rename change the name of a cms file
punch punch a copy of a
print print a cms file
erase erase a cms file
listfile list information on a cms file
state verify the existence of a
statew verify the existence of a
readcard read a cms file from your card reader onto disk
disk dump punch a cms file in cms disk
4
compare compare the contents of ems disk files
tape dump
tape load read cms files onto disk
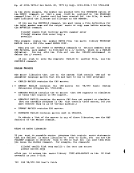
EDIT:
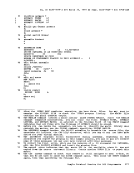
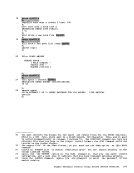
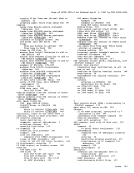
1
the message
2 Check that the image setting is
truncation limit of 12.
3 Enter the subcommand
For these input files, you should press the Tab key (or equivalent) on your terminal
following each
in column 12, the input data appears aligned.
4 The message,
truncation limit you set for the file (column 12). The editor displays the line, so
you can see how much of the line was accepted.
input mode, so continue entering input lines.
5 To get out of input mode, enter a null line (press the Return or Enter key without
entering any data). The editor responds with the message EDIT:.
354