When Hercules is powered on the socket printer begins listening for incoming connections on the IP ad-
dress and port number that are assigned to it. When you start HercPrt you define a printer at the same IP
address and the same port number and click the connect button.

HercPrt should then establish a connection to that Hercules printer and immediately begins spooling re-
ports from this printer if any are available.

Whether any reports are available or not on a given printer (as well as how to print them) depends on the
guest operating system and associated spooler running under Hercules and is beyond the scope of this
manual.

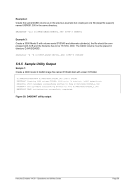
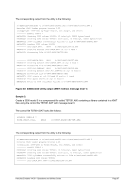
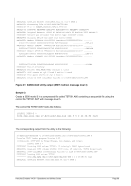
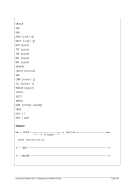
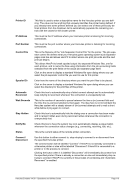
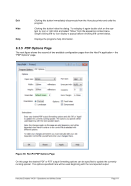
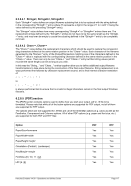
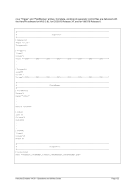
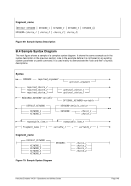
6.2.4 Program Options Page

The following figure shows the first of two available configuration pages from the HercPrt application the
“Program Options” page.

Figure 57: HercPrt Program Options Page

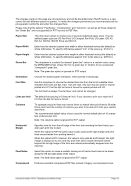
On the “Program Options” page you can configure the following:

Printer ID

This field is used to enter a descriptive name for the Hercules printer you are defi-
ning. The value can be anything that uniquely identifies the printer being defined. If
you already have some printers defined you can select one of these previously de-
fined printers from the dropdown list to automatically populate the remaining con-
trols with the values for the chosen printer.

IP Address

This must be the IP address where your Hercules printer is listening for incoming
connections.

Port Number

This must be the port number where your Hercules printer is listening for incoming
connections.

Control File

This is the filename of the “Job Separator Control File” for the printer. The job sepa-
rator control file defines what your Hercules guest operating system’s job separator
pages look like and allows HercPrt to detect where one print job ends and the next
print job begins.

This allows HercPrt to break spooled output into separate Windows files, one for
each printout, and to name the files using information from the job accounting fields
extracted from the print fields on the actual job separator page itself.

Click on the arrow to display a standard Windows file open dialog where you can
select the job separator control file you want to use for this printer.

Spooler Dir

Enter here the name of the directory where you want the print files to be placed.

Click on the arrow to display a standard Windows file open dialog where you can
select the directory for the print files of this printer.

Automatic
Reconnect

Check this box to automatically retry a failed connect attempt and to automatically
keep retrying to reconnect whenever the connection is unexpectedly lost.

Wait Seconds

This is the number of seconds to pause between the time a (re-)connect fails and
the time the (re-)connect attempt is tried again. The idea here is not to bombard the
Hercules system with a steady stream of (re-)connect attempts and to wait a short
while before trying again to connect.

Stay Hidden

Check this box to automatically hide the dialog once a connection has been made
and to remain hidden even during reconnect retries whenever the connection is
unexpectedly lost.

Notify Me

Check this box to have the system tray icon automatically display a popup ballon
whenever the connection status changes (e.g. connecting, receiving, idle, etc.).

Status

This is the current status of the remote printer connection.

Connect /
Disconnect

Use this button to either connect to, stop retrying to connect to or disconnect from
the specified Hercules printer.

The connect button will be labelled “Connect” if HercPrt is not already connected to
a Hercules printer or else will be labelled “Disconnect” if HercPrt is connected to a
printer or in the process to connect.

Clicking the button when it is labelled “Disconnect” will immediately disconnect from
the specified printer if there is already a connection or else will immediately stop re-
trying to connect if HercPrt is currently in the process of connecting and “Automatic
Reconnect” is enabled.

Previous Page Next Page