Page of SA2 1-921 3-0
Issued 15 September 1975
By TNL: SN21-0247
Printer Installation Procedure
0 1.
0 2.
0 3.
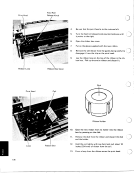
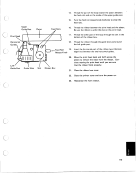
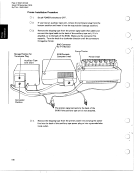
Storage Position for
Terminator Plug
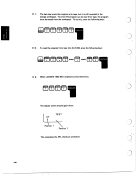
Set all POWER switches to OFF.
If you have an auxiliary tape unit, remove the terminator plug from the
bottom position and insert it into the top position (storage position).
Remove the shipping tape from the printer signal cable (flat cable) and
connect the signal cable to the back of the auxiliary tape unit, if it is
attached, or to the back of the 5100. Make sure the connector fits
squarely. Turn the knob in a clockwise direction until the connectors
fit together firmly:
')
Forms Tractor
L-4
\ Printer (rear)
5100 Portable
Computer (rear)
0 4. Remove the shipping tape from the printer power line and plug the power
line into the back of the auxiliary tape power plug or into a grounded elec-
trical outlet.
3
198
li
Issued 15 September 1975
By TNL: SN21-0247
Printer Installation Procedure
0 1.
0 2.
0 3.
Storage Position for
Terminator Plug
Set all POWER switches to OFF.
If you have an auxiliary tape unit, remove the terminator plug from the
bottom position and insert it into the top position (storage position).
Remove the shipping tape from the printer signal cable (flat cable) and
connect the signal cable to the back of the auxiliary tape unit, if it is
attached, or to the back of the 5100. Make sure the connector fits
squarely. Turn the knob in a clockwise direction until the connectors
fit together firmly:
')
Forms Tractor
L-4
\ Printer (rear)
5100 Portable
Computer (rear)
0 4. Remove the shipping tape from the printer power line and plug the power
line into the back of the auxiliary tape power plug or into a grounded elec-
trical outlet.
3
198
li